Showing posts with label fabric. Show all posts

Wednesday, November 9, 2011

Easy Applique


If I can applique, anyone can do it! I’m flying to Houston next week (girls’ weekend!) to see my Bestie, Jennifer, and I want to take some treats to her three kiddos. These are not the kind of treats that the kids will appreciate, but their Mommy sure will! She’s already seen the pics of the shirts, so I’m not ruining any surprises! Smile 

I only learned how to sew back in March when I took a four week sewing class with my Seester, Drennon. We learned to make a child’s “Johnny” romper, and the sewing bug hit. I can’t do anything fancy, but if I can make an entire quiet book from scratch, then anyone can learn to sew!
I bought three t-shirts (2 girls, 1 boy) from Wal-Mart at $3.88 each, as well as some Christmas fabric from JoAnn’s a few weeks ago on sale. I only needed a 1/4 of a yard, so the fabric only cost a couple bucks, if that. The girls’ shirts were easy. I cut out a Christmas tree and sewed it on their shirts and placed a button at the top for a “topper”. The boy’s shirt was a little harder because I thought the tree was a little “girly” for him. I finally decided on an “a” for Alex. I made the “a” using Word Art in Microsoft Word. The font is “Howser”. All I did was stretch it on the screen to the size I needed and then printed it out.
Screen Shot
I then made sure the size of the letter would work on the shirt. I traced around the letter with a Sharpie (my black ink was running low in my printer) so it would show through the back of the page (more on that below).

Heat n Bond is your best friend when making an applique! It eliminates the need to pin your fabric to the clothing. Make sure you follow the package instructions when ironing it on your fabric.

One thing to remember when using Heat n Bond is that you need to reverse your image on the smooth side of the paper so it will turn out correctly on the fabric. (I think there is a way to do this in Word, but I don’t know how yet!) This will make much more sense when you are actually working with the paper! I turned my computer paper over (the side with the “a” printed on it), traced the “a” on the back side of the paper, placed the Heat n Bond on top of the paper, and then traced again onto the Heat n Bond. Clear as mud?!

Cut around your letter so there’s not much paper around the edges (this keeps you from wasting fabric). Then, use your iron to bond the paper to your fabric. Again, follow the package directions.

Once the paper is bonded to the fabric, cut out your letter and make sure it looks good on your shirt.

Then peel of the paper backing to reveal the “glue” that will hold your fabric to the shirt. It will be shiny but not sticky.

Place your letter on the shirt exactly where you want it to stay and then iron it on. It’s so easy!

Once your letter is bonded to the fabric, it’s time to sew! Pick out a coordinating thread and sew around the edges of the letter. I’ve used a zig zag stitch as well as a straight stitch in the past. For this project, I chose a “tight” straight stitch in bright green. Don’t forget to sew around the middle hole if your letter has one!

Here are all three shirts! I am so excited to get these on those three kiddos! I made E a tree shirt too! Hers is white with a red button.

The total for all three shirts was about $15 since I already had the thread, buttons, and Heat n Bond.


Beth

Linking up to these fabulous parties!
Tatertots & Jello, Between Naps on the Porch, My Uncommon Slice of Suburbia, Serenity Now, Mommy By Day Crafter By Night, The 36th Avenue, The DIY Showoff, Today’s Creative Blog, At the Picket Fence, Home Stories A to Z, Gingerbread, Remodelaholic, Thrifty Décor Chick, The CSI Project, Beneath my Heart, Crafty Scrappy Happy

Monday, October 17, 2011

Roman Shades from Mini Blinds

We’ve been needing some major updating in our bedroom. I’m working on a headboard plan, so I thought I should tackle the window treatments as well. We’ve had these treatments for about five years, and I have loved them.
 
My mom made the valances, and we used some of her old drapes to balance out the windows. They have held up well and looked great, but it was time for a change. I’m going for a less-is-more look in our bedroom now since it’s so small. It's always been small, but I just now noticed! We have a huge bed and dark furniture, so I want it to feel larger. When I saw this tutorial on making roman shades from mini blinds, I knew that’s what I wanted to do. I was going to attempt doing a tutorial for y’all (took pics and everything), but this one is so clear and fabulous, I just want you to use it instead.

First, I had to find some fabric that I loved. Our walls are blue and our coverlet is cream, so I wanted to keep the fabric neutral. Enter this fabulous fabric I found at JoAnn’s! It was on clearance for $8 a yard, then 50% off that, plus a $1.50 end of bolt discount, plus a 20% off entire purchase coupon. I got 3.8 yards for $11! I did a happy dance in the aisle when I found the fabric. E was yelling “No Mommy!” She hates it when I dance. I’m not THAT bad.


I got these mini blinds at Wal-Mart for about $10 each. I needed two.


I used Liquid Stitch to glue my blinds to the fabric and Stitch Witchery to hem the sides of the fabric. The main thing when gluing your fabric to the blinds is to make sure you don’t get any glue on the lift cord. Your blinds will not slide up and down if the lift cord is not completely free.


Ben decided to take a pic of me hanging the blinds. I love a good power drill!


Here’s the before of the other side of the room. Don’t you love my alarm clock I’ve had since I was in middle school? I just can’t part with it!


TaDa!! Here are our new Roman Shades! I am so happy with the results. The room looks so much lighter and brighter. I still need to get some black out shades to go underneath because we like our bedroom nice and dark.


The blinds go up and down very easily. I chose to extend the fabric outside of the molding because of the way our windows had been installed. There was no room to mount the blinds on the inside of the window. The window frame is almost flush with the molding.


Close up of the pleats. This fabric could not be more perfect for our room! I am still pinching myself that I got such a great deal on it!


Here’s the whole room with both Roman Shades. Tiny, isn’t it?


Tackling the headboard is next, and then I’m thinking the bedside tables need a nice coat of Annie Sloan Chalk Paint in Old White. Then, maybe I’ll be done!


Making these shades was so easy! The hardest part was measuring and making sure my fabric was even. I think my total for this project was around $35 for BOTH shades!
Beth


Linking up to these fabulous parties!
Tatertots & Jello, Between Naps on the Porch, My Uncommon Slice of Suburbia, Serenity Now, Mommy By Day Crafter By Night, The 36th Avenue, The DIY Showoff, Today’s Creative Blog, At the Picket Fence, Home Stories A to Z, Gingerbread, Remodelaholic, Thrifty Décor Chick, The CSI Project, Beneath My Heart

Friday, October 14, 2011

Headboards: To Tuft or to Trim with Nailheads?


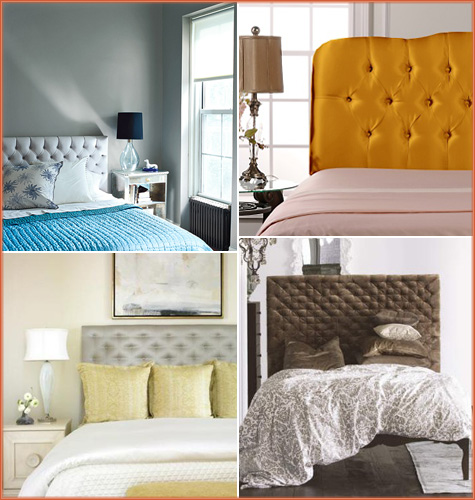
I’m having a bit of a headboard dilemma. To tuft or to nailhead, that is the question? My original plan was to make a tufted headboard for our master bedroom. Currently, we have a big, dark wooden headboard that looks massive in our tiny bedroom. I'm looking to soften up the room a bit with some fabric. I've ready many tutorials on tufting headboards and thought I was all ready to go!

Then, I started seeing more and more headboards trimmed in nailheads. I like this look too! The tufted headboard will require more time, work, and supplies. I will need to buy foam, batting, embroidery needles and thread, button covers, and who knows what else. For a headboard trimmed in nailheads, I can eliminate the foam (it’s expensive!), embroidery needles and thread, and button covers. I will need to buy the nailheads, but I’m thinking they will still be cheaper than all those other supplies. I would use thicker batting with the nailheads, so I don't have to buy foam too. I already have my fabric, and I’m leaving that choice as a surprise! It was super cheap, and I’m so excited about using it (it’s a solid color)!

My dilemma is that I don’t want to do the nailhead headboard just because it is cheaper. I want to be happy with my headboard for years to come! Please help me decide which look to go for, please! We have a king size bed, so this will be a big project!

I like the shape of this headboard. It’s neither tufted nor trimmed in nailheads, but the shape is awesome, but it might be a little ambitious for me.
Rooms With Wood Trimmed Walls

This one is nice and simple. I like the nailheads only trimming the side of the headboard.
Pinned Image

Love the shape and nailheads on this one! I know it’s not a headboard, but you get the idea.
Pinned Image

Oh dear, this is gorgeous!
Pinned Image

Tufted headboard with tutorial by Centsational Girl.
Pinned Image

More nailheads. This is the simple shape I think I’m going for…
Pinned Image

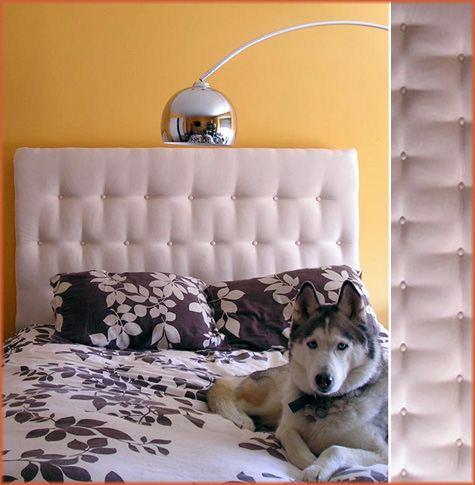
More tufting in solid  colors.
Tufted Headboard 3

Had to include the puppy dog in this one!
Tufted Headboard 2

I like the height of this one.
Pinned Image

Please let me know your thoughts in a comment! I would love some help deciding on tufted vs. nailhead, please!

Have a fabulous, fall weekend!

Wednesday, September 21, 2011

A New Lamp Shade + A Craft Fail

I had the bright idea to recover a lampshade one day last week. I thought it would be a quick and easy update to a boring, cream lampshade in our den. I already had fabric on hand that I wanted to use to bring a little more color into the room. I gathered my supplies,


measured my fabric and ironed the fabric under on the ends,


began to hot glue the fabric to the lamp shade,


I was so careful...


And then I realized that gluing fabric to a tapered shade was not going to work out. No matter how much I tried to make it work. I knew the shade was tapered when I began, but I really thought I could cut and stretch the fabric to make it work. Nope.

Enter new lamp shade from Wal-Mart. It is a 14 inch drum shade that was $14.99.


Let's start this process again, shall we? I started by hot gluing one end of the fabric to the inside seam on the lamp shade. I applied a little spray adhesive to the wrong side of the fabric to help it stick to the shade while I rolled and glued the fabric to the inside of the shade.


What is this???? Why is is puckering? Oh, upon careful inspection, this shade is not a perfect drum shade. The top part of the shade is just slightly smaller than the bottom. Thanks Wal-Mart. I decided to make it work. I was ok with a few puckers.


The inside looks messy...


But the outside seam looks pretty good! This side will be turned so it faces the wall. I love all these colors together.


And here it is! A nice, little update to a boring lampshade.


One of my fall vignettes. I spray painted two shiny, silver lanterns I found at Lowe's on clearance in an oil rubbed bronze color and added some fake pumpkins and gourds from Michael's. The second lantern is larger, and I think I got them both for $6! Take that Pottery Barn!


You can really see the puckers in this shot, but they do not show up like that in person, I promise.


Have you had a craft fail recently? Please tell me you have!
Posted by Picasa

Sunday, September 4, 2011

I Made A Wreath Out of What?

Hate buying expensive wreath forms at Michael's and Joann's? Try using pipe insulation from Home Depot to make your next wreath! I got a 4 pack for $2.47! 
Just bend the insulation and secure the two ends with tape. I used painter's tape because that's what was closest to me. 

For this wreath, I decided to wrap it in yarn and make fabric rosettes again. I wanted another fall wreath for inside our house. 
I placed pins equal distances apart around the wreath so each section of yarn would be the same width. Then I started wrapping very carefully so each loop of yarn laid neatly beside the one before. 


Then it was time to make some more fabric rosettes. I used the same technique that I did for my last wreath. I made a few different sizes then hot glued them to the wreath.
Finished product! I'm waiting to find the perfect place for it once I get out all my fall decor!
Linking to:


Posted by Picasa