Monday, October 31, 2011

Halloween Treats from Mama Bear


On Thursdays, I take a group of six nursing students to the hospital for their clinical day. It's a fun but very hard and exhausting day keeping up with six students, their patients, all their charting, and all their care of said patients. My students have done a great job this semester and have improved so much! I decided I would make them some Halloween treats since they are poor, starving college students! They don't call me "Mama Bear" for nothing! I love to take care of my sweet students.
I don't even know what you call these treats. They are super easy to make, and the salty/sweet taste is so yummy! I made these for E's birthday party back in the summer but decided to give them a fall look for Halloween.
To make these chocolate/pretzel treats, you need: a bag of pretzels (I like the square, checkerboard kind), Hershey's Kisses, and Reese's Pieces or M&M's.

Preheat your oven to 275 degrees. Then lay out your pretzels in a single layer on a large cookie sheet. Place a kiss on top of each pretzel. Unwrapping the kisses is the longest, hardest part of making this treat. Stressful, I know.

Bake the pretzel/kiss combo at 275 for FOUR minutes. You want the kisses soft enough so you can press a Reese's Piece or M&M into the kiss. The Hugs (white chocolate striped kiss) melted a little faster than the milk chocolate kisses, so you could do these separately if you wanted and only bake them for three minutes. Make sure you press the Reese's Piece firmly into the kiss so it "bonds" to the pretzel. Don't these look YUMMY?! I may or may not have eaten a dozen couple in the process...

Then, place the whole tray into the fridge so the chocolate hardens.

Now, the fun part! Either keep them all for yourself (because you can’t bear giving away such a yummy sweet/salty treat) or package them up to give away. I placed mine in baggies and then into these little, tin buckets I found in the Target dollar section. A little orange tissue paper, and you're set!

My students were so excited about their homemade treats! They don't call me Mama Bear for nothin!

These treats can be changed up in all sorts of ways. I plan on making them again once the red and green M&M’s are out for Christmas. These are so easy and always a huge hit since you can satisfy a sweet and salty tooth with a dozen one bite!
Happy Halloween!
Beth


Linking up to these fabulous parties!
Tatertots & Jello, Between Naps on the Porch, My Uncommon Slice of Suburbia, Serenity Now, Mommy By Day Crafter By Night, The 36th Avenue, The DIY Showoff, Today’s Creative Blog, At the Picket Fence, Home Stories A to Z, Gingerbread, Remodelaholic, Thrifty Décor Chick, The CSI Project, Beneath my Heart

Friday, October 28, 2011

This Week I’m Loving…

This super cute Christmas banner was designed by my bloggy bud MJ from 517 Creations. She has a great “31 days of warming up to the holidays” series going on this month. You can rest assured that this banner will be hanging from my new “mantels” this year!
Pinned Image
via
Aren’t these appliques precious?! Appliques are a quick and easy way to dress up or personalize a plain t-shirt, and these patterns would be easy to free hand!
Pinned Image
via
This is just genius! In our next house, we will have a hidden dog food drawer!
Pinned Image
via
The website Bump Smitten is entirely dedicated to baby showers. There are some of the sweetest and cutest ideas on this site! The picture below is from a Pat the Bunny themed shower with adorable invitations.
Pinned Image
via
One more party…I see this one in my future! This homemade Mickey Mouse 2nd birthday party is so cute, and I love the color combo of light blue and red!
Pinned Image
via
I hope everyone has a great weekend and a happy and safe Halloween!
Beth
5 Minutes Just For Me

Wednesday, October 26, 2011

Redneck Girl


Much to her Daddy's delight, this little redneck girl loves animals, the outdoors, and loves to go looking for deer and turkey. We’ll be driving down the road and she’ll say, “I don’t see any deer! I don’t see any turkeys! Go look!” Her Daddy is thrilled, of course. Ben bought her a camo hat that says “Camo Cutie” on it. She loves to wear it!
A true redneck girl loves to sit in the back of a pick-up! She may follow in her Mommy’s footsteps and drive a 4x4 truck as her first car! Though, the only boy’s lap she will be sitting on for quite some time will be her Daddy’s…

She cracks me up in this picture. It looks like she’s saying “Hey you! Whassup?”

This little Camo Cutie will be decked out in some real camo before too long! Ben can’t wait to take her hunting and fishing!

Love my sweet redneck girl (who also wears very pretty smocked dresses)!

Beth

Monday, October 24, 2011

Playroom Gallery Wall


I decided to make some changes to Elliotte’s playroom this weekend. I’ve been wanting to add a chalkboard to the wall so she can draw and color to her heart’s content. Anything to keep her occupied for a few minutes! I also wanted a place where we could display her “artwork”. I picked up a thin piece of plywood from Home Depot and painted it with chalkboard paint. I also got some trim so I could add a frame to the chalkboard. After cutting the trim with a friend’s miter saw (the cuts with the miter box last time were too rough, and I really wanted to use a miter saw!), I hot glued the frame together and then spray painted it.


Below is a pic of the green paint I started out with. It was WAY too bright, so I went with a softer blue, and it turned out much better.


The color is Peekaboo Blue by Krylon.


Much better!


After the paint dried, I glued the frame to the chalkboard with Liquid Nails and placed some of Ben’s weights on top to make a good seal. After a few hours, it was ready to hang!


Here’s the chalkboard all finished along with a new gallery wall! I am so excited about E’s new gallery wall in her playroom! The white frames are from Michael’s, and I plan to paint them a few different colors. The pink frames are from Goodwill. I spray painted them and added some scrapbook paper and metal clips to display artwork.


The table and chairs were mine when I was little and they received an update a few months ago.


E now has a proper place for tea time!


I ordered these baskets from WUSLU knowing that I would use them for playroom storage. The bottom basket holds favorite friends, and the top basket holds E’s chalk for now.


E can draw on her tabletop too! It’s coated in chalkboard paint as well.

I still need to fill in two of the white frames, but I couldn’t wait to post about the new gallery wall! I can’t wait to see E playing in here now and all the pretty pictures she will draw on her new chalkboard!


Please excuse the horrible lighting in these pictures! The playroom is in the end our basement that does not have any natural light! It’s a fabulous space, but you have no idea if it’s day or night!

Beth


Linking up to these fabulous parties!

Friday, October 21, 2011

This Week I am Loving…


We have had one hectic week! E had a stomach virus, then passed it to me, then add in 32 nutrition papers, 32 reading guides, and 5 care plans to grade=NO blog/Pinterest time this week! So sad! I did manage to squeeze in a tiny bit of pinning…
My phone disappeared into thin air last week and I HAD to get an iPhone to replace it. Why not? I will definitely be making these DIY phone covers to change out whenever the mood strikes! Too cute!
Pinned Image
via
These fabric flowers are so easy! I made one the other day from one of Ben’s ripped Mossy Oak t-shirts! Oh, the blasphemy!
Pinned Image
via
It is never too early to start thinking about Christmas décor. Although I am adamantly against decorating for Christmas until after Thanksgiving, I can Pin ideas all year long! This spray painted pine cone wreath would be so cheap and easy if you have a nice, big pine tree in your yard! You could even spray them red and green!
Pinned Image
via
Have a fabulous weekend!

Beth


5 Minutes Just For Me

Monday, October 17, 2011

Roman Shades from Mini Blinds

We’ve been needing some major updating in our bedroom. I’m working on a headboard plan, so I thought I should tackle the window treatments as well. We’ve had these treatments for about five years, and I have loved them.
 
My mom made the valances, and we used some of her old drapes to balance out the windows. They have held up well and looked great, but it was time for a change. I’m going for a less-is-more look in our bedroom now since it’s so small. It's always been small, but I just now noticed! We have a huge bed and dark furniture, so I want it to feel larger. When I saw this tutorial on making roman shades from mini blinds, I knew that’s what I wanted to do. I was going to attempt doing a tutorial for y’all (took pics and everything), but this one is so clear and fabulous, I just want you to use it instead.

First, I had to find some fabric that I loved. Our walls are blue and our coverlet is cream, so I wanted to keep the fabric neutral. Enter this fabulous fabric I found at JoAnn’s! It was on clearance for $8 a yard, then 50% off that, plus a $1.50 end of bolt discount, plus a 20% off entire purchase coupon. I got 3.8 yards for $11! I did a happy dance in the aisle when I found the fabric. E was yelling “No Mommy!” She hates it when I dance. I’m not THAT bad.


I got these mini blinds at Wal-Mart for about $10 each. I needed two.


I used Liquid Stitch to glue my blinds to the fabric and Stitch Witchery to hem the sides of the fabric. The main thing when gluing your fabric to the blinds is to make sure you don’t get any glue on the lift cord. Your blinds will not slide up and down if the lift cord is not completely free.


Ben decided to take a pic of me hanging the blinds. I love a good power drill!


Here’s the before of the other side of the room. Don’t you love my alarm clock I’ve had since I was in middle school? I just can’t part with it!


TaDa!! Here are our new Roman Shades! I am so happy with the results. The room looks so much lighter and brighter. I still need to get some black out shades to go underneath because we like our bedroom nice and dark.


The blinds go up and down very easily. I chose to extend the fabric outside of the molding because of the way our windows had been installed. There was no room to mount the blinds on the inside of the window. The window frame is almost flush with the molding.


Close up of the pleats. This fabric could not be more perfect for our room! I am still pinching myself that I got such a great deal on it!


Here’s the whole room with both Roman Shades. Tiny, isn’t it?


Tackling the headboard is next, and then I’m thinking the bedside tables need a nice coat of Annie Sloan Chalk Paint in Old White. Then, maybe I’ll be done!


Making these shades was so easy! The hardest part was measuring and making sure my fabric was even. I think my total for this project was around $35 for BOTH shades!
Beth


Linking up to these fabulous parties!
Tatertots & Jello, Between Naps on the Porch, My Uncommon Slice of Suburbia, Serenity Now, Mommy By Day Crafter By Night, The 36th Avenue, The DIY Showoff, Today’s Creative Blog, At the Picket Fence, Home Stories A to Z, Gingerbread, Remodelaholic, Thrifty Décor Chick, The CSI Project, Beneath My Heart

Friday, October 14, 2011

Headboards: To Tuft or to Trim with Nailheads?


I’m having a bit of a headboard dilemma. To tuft or to nailhead, that is the question? My original plan was to make a tufted headboard for our master bedroom. Currently, we have a big, dark wooden headboard that looks massive in our tiny bedroom. I'm looking to soften up the room a bit with some fabric. I've ready many tutorials on tufting headboards and thought I was all ready to go!

Then, I started seeing more and more headboards trimmed in nailheads. I like this look too! The tufted headboard will require more time, work, and supplies. I will need to buy foam, batting, embroidery needles and thread, button covers, and who knows what else. For a headboard trimmed in nailheads, I can eliminate the foam (it’s expensive!), embroidery needles and thread, and button covers. I will need to buy the nailheads, but I’m thinking they will still be cheaper than all those other supplies. I would use thicker batting with the nailheads, so I don't have to buy foam too. I already have my fabric, and I’m leaving that choice as a surprise! It was super cheap, and I’m so excited about using it (it’s a solid color)!

My dilemma is that I don’t want to do the nailhead headboard just because it is cheaper. I want to be happy with my headboard for years to come! Please help me decide which look to go for, please! We have a king size bed, so this will be a big project!

I like the shape of this headboard. It’s neither tufted nor trimmed in nailheads, but the shape is awesome, but it might be a little ambitious for me.
Rooms With Wood Trimmed Walls

This one is nice and simple. I like the nailheads only trimming the side of the headboard.
Pinned Image

Love the shape and nailheads on this one! I know it’s not a headboard, but you get the idea.
Pinned Image

Oh dear, this is gorgeous!
Pinned Image

Tufted headboard with tutorial by Centsational Girl.
Pinned Image

More nailheads. This is the simple shape I think I’m going for…
Pinned Image

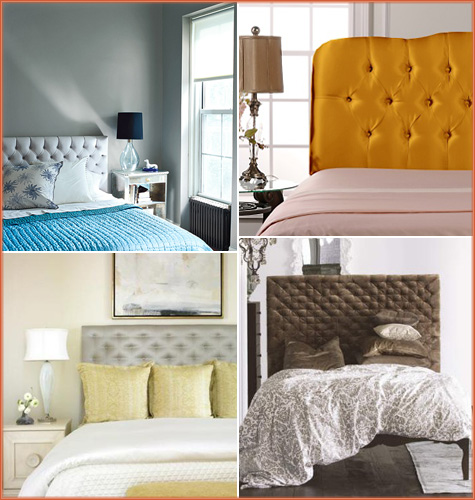
More tufting in solid  colors.
Tufted Headboard 3

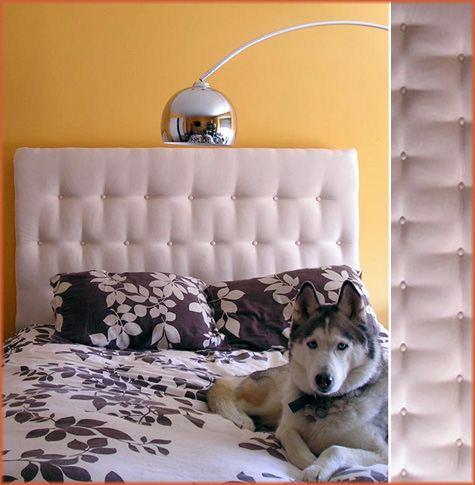
Had to include the puppy dog in this one!
Tufted Headboard 2

I like the height of this one.
Pinned Image

Please let me know your thoughts in a comment! I would love some help deciding on tufted vs. nailhead, please!

Have a fabulous, fall weekend!